Traverse Global v11.2 - Service Repair
Terminals
Use the Terminals function to set up and configure sales terminals. A terminal allows you to configure a register with specific defaults, such as store ID, receipt header, layaway days, distribution code, and many others. You can create as many or as few terminals as necessary. The settings for each terminal are stored in a (terminal) configuration table.
A terminal ID can represent an individual piece of hardware, such as a cash box, or a particular mobile terminal or register. The terminal ID can also represent a configuration for registers or terminals belonging to a particular group or department even if the group is located in multiple stores. If you want a terminal to always be set up a particular way for a certain user, the terminal ID can represent those settings. If you do not need to have multiple terminal configurations, or if you only have one sales register, you can set up a global default terminal configuration.
To utilize a payment service provider, you must configure the gateway settings for that provider. See Gateway Settings for more information.
When a user logs into a sales terminal, the POS terminal application looks for the configuration settings for the register or terminal in a particular order. If the application cannot find a terminal ID in the configuration table, it will search for the next configuration in the following order:
| What the POS application is looking for | What the terminal ID represents | When you would use this | |
|---|---|---|---|
| 1. | Terminal ID listed in user configuration | In this situation, the terminal ID represents hardware, such as a cash box, that is tied to a particular user. This means that the POS application uses the same terminal configuration settings any time the user logs onto a register. | If your sales associates have individual cash drawers they may take with them to different sales terminals, you can set up terminal IDs with different distribution codes to assign to each user. If only one of your sales associates can offer a discount, you can set up a terminal ID with a max discount percentage and assign that terminal ID to the user. |
| 2. | Machine name | The terminal ID represents a device or machine. The machine name must be used as the terminal ID. This allows a machine or register to have its own unique configuration. | If only one of your sales registers has a credit card reader, you can configure the terminal ID (machine name) to have a default credit card payment option. Likewise, if only one register is connected to an invoice printer, you can configure that terminal ID (machine name) with an invoice printer. |
| 3. | Config ID listed in user configuration |
Though this field is not named "terminal ID", in the (terminal) configuration table, the value in the config ID field represents the terminal ID. Config ID equals terminal ID. |
If you want all the sales terminals in a group or department to be configured the same with the same distribution code or the same sales rep no matter which store or location the terminal is in, you can set up a configuration for those registers and assign the config ID to the sales associates in that department or group. |
| 4. | Global default terminal ID | This is a "blank" terminal ID that represents a default, generic sales terminal configuration. | If you have a number of registers that you want to have the same settings. |
Create a terminal ID for each POS terminal configuration you will use.
To add a terminal:
- Open the Terminals function from the Point-of-Sale Setup and Maintenance menu.
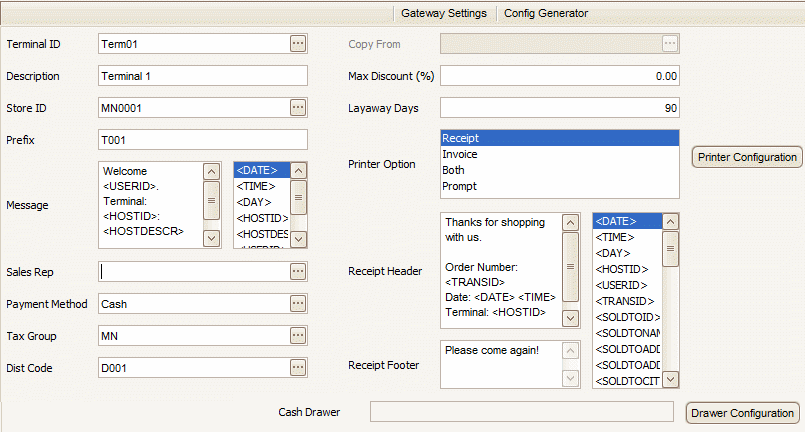
- Click the New button on the toolbar to open a blank terminal record.
- Enter a terminal ID in the Terminal ID field.
- If you are creating a generic global configuration, leave the Terminal ID field blank.
- If you are creating a configuration for a specific machine, enter the machine name in the Terminal ID field.
- If you are creating a configuration for a group or department, enter a value to use to reference the configuration in the Terminal ID field.
- If applicable, select an existing terminal from which to copy settings in the Copy From field.
- Enter a description in the Description field.
- If applicable, enter or select a location ID (IN locations) in the Store ID field.
- Enter a transaction prefix in the Prefix field. This is used to generate unique transaction IDs for each terminal.
- Enter a message to appear on the terminal menu in the Message field. The text may contain one or more menu message tokens. You can drag and drop message tokens from the Message Token list into the Message field.
- If you want a default sales rep for the terminal, enter or select a sales rep in the Sales Rep field.
- Enter or select a default payment method for the terminal in the Payment Method field.
- Enter or select a tax group in the Tax Group field.
- Enter or select a distribution code in the Dist Code field.
- If applicable, enter a maximum discount percentage allowed in the Max Discount field. A value of 0 means there is no maximum discount percentage.
- If applicable, enter the number of days before a layaway is due to be paid in full in the Layaway Days field. A value of 0 means there is no default due date.
- In the Printer Option field, you can select the type of form printer you would like to configure on the terminal. Select Receipt if you want the terminal to print a receipt for all transactions, Invoice if you want the terminal to print an invoice for all transactions, Both if you want to print both a receipt and an invoice for transactions, or Prompt if you want the terminal to ask the user whether to print an invoice or a receipt for each transaction. Once you select the type of form printer, click the Printer Configuration button to set up the printer.
- Enter the text to print on the copy of the invoice or receipt in the Copy Text column, if applicable.
- Enter the order in which to print the copy in the Order column.
- Select the printer which will print the invoice or receipt in the Printer column. Leave the value set to {Default} to use the terminal's default printer.
- Once you select a printer, the Tray column drop-down will list the available trays on your printer. You can choose a tray from which to print the form, or leave the option set to Automatically Select, which will print the form from the printer driver's selected tray.
- Select the Active check box to print the copy; otherwise, clear the check box.
- Press the Save button to save the terminal settings.
- Enter a text value to include on the header and/or footer of the receipt in the Receipt Header and/or the Receipt Footer fields. Text may contain one or more receipt tokens. You can drag and drop message tokens from the Receipt Tokens list into the Receipt Header and/or the Receipt Footer fields.
- The Drawer Configuration button will open the Cash Drawer function. This function allows you to configure how the terminal will communicate with the cash drawer.
- Select a Device Type from the drop-down list. Choose Serial if the cash drawer is connected to the terminal via a serial port connection; otherwise, select Printer.
- Select the Device Name, as applicable, from the drop-down list.
- The ASCII Code is the code the printer/device needs to issue the "open" command to the drawer. Select the ASCII code(s) required for your device from the drop-down list. Contact the device manufacturer or your software provider for more information.
- Press the Test button to test the drawer configuration.
- Press the OK button to save the drawer settings.
- Press the Save button to save the terminal settings.
The Printer Configuration button will open the Form Printers function. This function allows you to specify the printer, copy text, and other options for the form printer(s).
In the row for the form printer you wish to configure:
You can set up multiple configurations for each printer. For instance, if you want to print two copies of each receipt, but you want to print one on standard white paper in one printer tray and one on colored paper from a different printer tray, you could configure two instances of the PS RECEIPT form, each printing to a different tray of the same printer.


To edit a terminal:
- Select a terminal configuration to edit in the Terminal ID field.
- Edit the applicable fields as required.
- Press the Save button to save your changes.
Deleting a terminal
- Select a terminal to delete from the Terminal ID field.
- Click the Delete button on the toolbar to delete the selected terminal.
- Click Yes at the "Are you sure you want to delete selected record(s)?" prompt.
You use a *.config file to set the Traverse terminal properties. This allows the terminal to connect to the Traverse database, as well as the Traverse license server, and also allows you to set the default company and logout delay for the terminal. To set up the TRAVERSE.POS.exe.config file, select the Config Generator button on the toolbar and follow these instructions.
If you wish to automatically authorize credit card transactions from the POS terminal through the Internet, you will need to set up a payment gateway. To do this, use the Gateway Settings function to configure the connection to the credit card processing provider. When available, the Point-of-Sale application will use the XWeb payment provider service by default. If you wish to add additional payment processors, please contact your software provider.
To configure the gateway for payments, select the Gateway Settings button on the toolbar and follow these instructions.